Contact Us isaveonplants@gmail.com
Save on Plants
Start you spring planting project now!
Watch our info videos below to learn about different plants and how to plant them.
Save money buying the plants direct and planting them yourselves.
Follow our easy instructions on planting and not only will you do a better job than
most professionals, you will save big!
Questions on plants or mulch?

Plastic Potted Plants
Before Planting
Warranty is only valid when the following have been completed:
-
Watch Info Video on Planting Cedars - either Balled/Burlapped or Potted, as it applies.
-
Watch info video on Watering
-
Conduct Drainage Tests on all holes. This involves filling holes to top with water.
-
Read material below and contact us with any questions
Pot Grown Cedars - All plastic pots must be removed
Cedars that we sell in plastic pots, have been pot grown and they will have roots wrapped around the sides of the root ball since they have been properly grown.
Dig holes a day or more prior to planting and fill hole with water, note how quickly water drains.
These tight roots will have to be massaged or ripped loose so that they do not continue to grow in a tight circle which will choke the plant.
Protect the exposed roots from direct sunlight while planting and never allow the root ball to dry out while planting. Best to dig your holes ahead of time and then do the actual planting either in early morning or late evening when the roots will not be exposed to direct sunlight.
Water all pots before you remove root ball from pots, lay pot on it's side, pull out root ball, quickly loosen roots, quickly place in hole, cover with bone meal and dirt mixture, immediately place hose with a very slow trickle at the trunk and flood the root ball and surrounding area.
Proper watering is very important. Be sure to watch our info video on watering. Improper watering is the leading cause of any cedar failure (for cedars that have been properly rooted like ours).
Lifting or Moving
Only move the cedars by handling the root ball or the trunk. Do not handle by grabbing the "leaves" as this will cause broken stems and in a few weeks those damaged stems will result in dried out brown "leaves". While this is not serious, it is unsightly and customers often panic when in a few weeks they see some very isolated dead stems.
This is a common problem and as long as the rest of the tree is a deep green then it is not an issue. If in doubt, send us some photos of the specific area along with photos of the entire group of plants.
Plant Immediately
Plant the trees as soon as possible preferably the same day, root ball must be kept very moist until ready to plant. Shield the root ball from the sun.
Root ball can be placed in a black plastic bag with a tiny hole in it and then fill the bag with water so that it deep moistens the root ball while allowing the water to slowly drain out of the bag. Be sure water drains out within about 3 hours.
Plant hole should be about twice the volume of the root ball size. Mix 50% native soil with 50% triple mix (never use pure tiple mix, it will burn the roots).
Bone meal and Calphos should be applied below under root ball, on sides of root ball and directly on top of root ball. Bone Meal is required, calphos is optional.
Calphos is a long term root stimulant. Never use fertilizer during the first year and definitely never in the hole near the roots.
Top of root ball should be flush with surrounding soil. Place about 1 inch of soil mixture over top of the root ball. Check 1 week later to see if additional soil needs to be added. Keep soil and mulch away from trunk.
Flood each tree very heavy immediately after planting as this will also help the soil to settle, do not stomp on root ball, let the water settle the soil, along with a little pressure from using you hands around the root ball, never feet.
Do not use stones or rocks over the root ball area as they will conduct the heat away from the root ball in the winter.
Water Properly
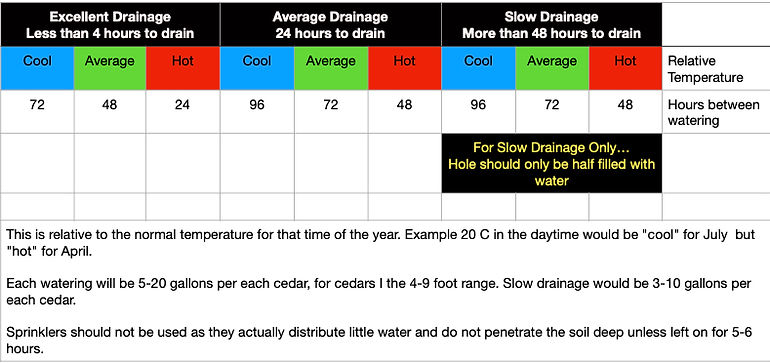
Drainage Test: Dig an 18 inch deep hole and fill to top with water. See table below for recommendations based on test results.
If you need clarification on your watering needs, please contact us immediately by email, provide details and drainage test results.
> Download Drainage Survey Form Here
The time between watering is a general guide for average weather during that month. However, weather is seldom average.
Your frequency for watering will have to be adjusted based on the weather. Heat, sun, and wind may increase the need to water, while cold, wet and cloudy will reduce the frequency. The amount of water will remain the same each time, it is the frequency that will change.
During the second year you can probably double the hours between watering while increasing the amount of water by about 20% to compensate for the growth in the tree.
Always water slow and long, allowing water to penetrate the area directly near the trunk. If you water fast, the water will run away from the root area.
If you find that you are deviating greatly from the guidelines above, you need to email us with information so that we can advise you. Send photos and info on the details of watering based on what we advised and what you are deviating from and why you are deviating. We are in the best position to advise you so contact us immediately, as failure to stick to the guidelines may invalidate the warranty. Contact us as soon as you feel you need to deviate greatly from the guidelines or at the first sign that any of the cedars are turning even a little pale. You may not be able to save that specific one but it may be a warning sign that will allow you enough time to save the others that have not reached that level of stress, yet.
Cedars do not allow you a lot of room to be wrong when it comes to watering, so contact us immediately at the very first sign of fading.
Install inspection pipe(s) spaced evenly throughout the hedge. The inspection pipes will fill faster than the root ball cavity, you may have to run the water 10 times as long as it takes to fill the inspection pipe.
You will not be overwatering the plants even if you give them way too much per application, as long as you allow the water to drain completely before watering again. The water must be allowed to drain before watering again, then wait 24 hours before watering heavy again. They cannot sit in water continuously nor can they be allowed to dry out.
With sandy fast draining soil you can pretty well water heavy again as soon as the water has drained, however this soil type is not common.
Windy and sunny conditions increase the need for watering. Cloudy and calm air reduce need for watering.
Water slowly and for a long time and literally drown the plant, allow to drain completely before watering again.
With slow draining soil, you should only apply half as much water as is required to fill the hole. If you are using a soaker hose then when the pipe is half full is the right amount of water.
Soil at the bottom of the inspection pipe should never be allowed to go dry during first year. However water should not be sitting at the bottom of the hole continuously. Must allow to drain completely.
Water at about half the frequency during the second year, while increasing the volume.
Be aware of any location characteristics that may effect drainage, ex. down spouts from roof, low or high spots in the ground, neighbours drainage.
If you are watering your grass with sprinklers, investigate how that water is draining. Sprinklers are generally not good for plants since they usually only water the surface soil and do not penetrate deep to the bottom of the roots and past them. Plants need deep watering and not surface watering. Better to water heavy, slow and not too frequently as the soil must be allowed to drain. Plants cannot sit in water for long. Lawn Sprinklers used on lawns where there is a slope towards cedars can easily drown the cedars if the soil does not drain easily. If you are watering your grass with sprinklers, investigate how that water is draining.
Large established trees near by can drain nutrients and water from your young plants. If this cannot be avoided, then pay close attention to the closest new trees as they may need extra water and nutrients. Cedars planted under the canopy of other trees are not by warranty.
Cedars like to be watered heavy but they must be allowed to drain completely before watering again. They cannot sit in water for long continuous periods. No two locations will be exactly the same, even within the same property, drainage and soil conditions vary. Know your soil, know your drainage and be in touch with the weather. The watering needs of your cedars will vary throughout the season. Water heavy but allow them to drain.
If you have questions, contact us via email immediately, we really would rather help you early on rather than when it is too late.
Winter Preparation
Water very heavy at the end of November just before the ground starts to freeze up, the tree needs the extra water for the winter.
Do not wrap the plants with burlap. Best to install posts at the corners and wrap burlap from post to post while not allowing the burlap to touch the plants. This will shelter the plants from the wind while not allow them to overheat which may happen if they are wrapped.
Never use salt near any plants especially cedars. If salt has been used the soil needs to be dug up and replaced with fresh soil.
2nd Year
Quality Osmicote time release fertilizer with micro-nutrients can be applied in late April during the second year. Your watering frequency will likely be reduced by a frequency of 50% but the amount of water per application may actually increase as the tree grows. This of course assumes similar weather in both years, so be in touch with the weather of that particular time.
Panic Button - Don't be afraid to use it - We want to help!
Cedars are not forgiving and once they start to get a washed out look they seldom come back.
At the first sign of the colour starting to look washed out, send us photos of the entire group and provide details of how you have been watering. i.e. How much, how often and method.
Sporadically spaced and totally dead small stems is a common occurrence with new cedars as they are a result of handling. Examine the stem closely and if the stem is broken then this is the cause. Just cut out the stem and new growth will fill in the area.
We really don't mind you contacting us with photos and questions. The sooner you contact us, the better chance you have of saving the tree(s).
Cedars do not give much warning. It is easier to save a plant than it is to replace one. Water long, slow and allow to drain completely.
Our advice is intended only for our method of root cultivation, always follow the instructions of where you purchased the plant as they will ultimately be the ones to warranty them. Our instructions will not work with improper root balls.
Thank You,
Phil
